Working on a remote HPC system
Overview
Teaching: 25 min
Exercises: 10 minQuestions
What is an HPC system?
How does an HPC system work?
How do I log in to a remote HPC system?
Objectives
Connect to a remote HPC system.
Understand the general HPC system architecture.
What Is an HPC System?
The words “cloud”, “cluster”, and the phrase “high-performance computing” or “HPC” are used a lot in different contexts and with various related meanings. So what do they mean? And more importantly, how do we use them in our work?
The cloud is a generic term commonly used to refer to computing resources that are a) provisioned to users on demand or as needed and b) represent real or virtual resources that may be located anywhere on Earth. For example, a large company with computing resources in Brazil, Zimbabwe and Japan may manage those resources as its own internal cloud and that same company may also use commercial cloud resources provided by Amazon or Google. Cloud resources may refer to machines performing relatively simple tasks such as serving websites, providing shared storage, providing web services (such as e-mail or social media platforms), as well as more traditional compute intensive tasks such as running a simulation.
The term HPC system, on the other hand, describes a stand-alone resource for computationally intensive workloads. They are typically comprised of a multitude of integrated processing and storage elements, designed to handle high volumes of data and/or large numbers of floating-point operations (FLOPS) with the highest possible performance. For example, all of the machines on the Top-500 list are HPC systems. To support these constraints, an HPC resource must exist in a specific, fixed location: networking cables can only stretch so far, and electrical and optical signals can travel only so fast.
The word “cluster” is often used for small to moderate scale HPC resources less impressive than the Top-500. Clusters are often maintained in computing centers that support several such systems, all sharing common networking and storage to support common compute intensive tasks.
Logging In
The first step in using a cluster is to establish a connection from our laptop to the cluster. When we are sitting at a computer (or standing, or holding it in our hands or on our wrists), we have come to expect a visual display with icons, widgets, and perhaps some windows or applications: a graphical user interface, or GUI. Since computer clusters are remote resources that we connect to over often slow or laggy interfaces (WiFi and VPNs especially), it is more practical to use a command-line interface, or CLI, in which commands and results are transmitted via text, only. Anything other than text (images, for example) must be written to disk and opened with a separate program.
If you have ever opened the Windows Command Prompt or macOS Terminal, you have seen a CLI. If you have already taken The Carpentries’ courses on the UNIX Shell or Version Control, you have used the CLI on your local machine somewhat extensively. The only leap to be made here is to open a CLI on a remote machine, while taking some precautions so that other folks on the network can’t see (or change) the commands you’re running or the results the remote machine sends back. We will use the Secure SHell protocol (or SSH) to open an encrypted network connection between two machines, allowing you to send & receive text and data without having to worry about prying eyes.

SSH clients are usually command-line tools, where you provide the remote
machine address as the only required argument. If your username on the remote
system differs from what you use locally, you must provide that as well. If
your SSH client has a graphical front-end, such as PuTTY or MobaXterm, you will
set these arguments before clicking “connect.” From the terminal, you’ll write
something like ssh userName@hostname, where the argument is just like an
email address: the “@” symbol is used to separate the personal ID from the
address of the shared resource.
Setup Revisited
The Lesson Setup provides instructions for installing a shell application with SSH, generating your public-private key pair, and installing the SSH agent.
If you have not completed Setup already, please do the following; skip any steps you have already completed:
- Open your terminal application.
- Generate a public-private key pair using the 255-bit EdDSA algorithm and 100 rounds of hashing:
[user@laptop ~]$ ssh-keygen -t ed25519 -a 100 # accept default location; enter a strong password- Check the SSH Agent by attempting to list the keys it knows about:
[user@laptop ~]$ ssh-add -l
- Iff this returns an error because the agent cannot be found, launch the SSH Agent as a background process:
[user@laptop ~]$ eval $(ssh-agent)- Register your private key (assuming it resides at
~/.ssh/id_ed25519) with the agent:[user@laptop ~]$ ssh-add -t 8h ~/.ssh/id_ed25519You can now use your strong SSH key to log in to remote machines and, for the next 8 hours, you will not have to type your password to do so: the SSH Agent handles it for you.
Go ahead and open your terminal or graphical SSH client, then log in to the cluster using your username and the remote computer you can reach from the outside world, Cloud resource.
[user@laptop ~]$ ssh [email protected]
Remember to replace yourUsername with your username or the one
supplied by the instructors. You may be asked for your password. Watch out: the
characters you type after the password prompt are not displayed on the screen.
Normal output will resume once you press Enter.
You may have noticed that the prompt changed when you logged into the remote
system using the terminal (if you logged in using PuTTY this will not apply
because it does not offer a local terminal). This change is important because
it can help you distinguish on which system the commands you type will be run when you
pass them into the terminal. This change is also a small complication that we
will need to navigate throughout the workshop. Exactly what is reported before
the $ in the terminal when it is connected to the local system and the remote
system will typically be different for every user. We still need to indicate
which system we are entering commands on though so we will adopt the following
convention:
[user@laptop ~]$when the command is to be entered on a terminal connected to your local computer[yourUsername@login1 ~]$when the command is to be entered on a terminal connected to the remote system$when it really doesn’t matter which system the terminal is connected to.
Looking Around
Very often, many users are tempted to think of a high-performance computing
installation as one giant, magical machine. Sometimes, people will assume that
the computer they’ve logged onto is the entire computing cluster. So what’s
really happening? What computer have we logged on to? The name of the current
computer we are logged onto can be checked with the hostname command. (You
may also notice that the current hostname is also part of our prompt!)
[yourUsername@login1 ~]$ hostname
login1.int.custom.learnhpc.eu
So, we’re definitely on the remote machine. Next, let’s find out where we are
by running pwd to print the working directory.
[yourUsername@login1 ~]$ pwd
/home/yourUsername
Great, we know where we are! Let’s see what’s in our current directory:
[yourUsername@login1 ~]$ ls
The system administrators may have configured your home directory with some helpful files, folders, and links (shortcuts) to space reserved for you on other filesystems. If they did not, your home directory may appear empty. To double-check, include hidden files in your directory listing:
[yourUsername@login1 ~]$ ls -a
  .            .bashrc
  ..           .ssh
In the first column, . is a reference to the current directory and .. a
reference to its parent (/home). You may or may not see
the other two files, or files like them: .bashrc is a shell configuration
file, which you can edit with your preferences; and .ssh is a directory
storing SSH keys and a record of authorized connections.
What’s different between your machine and the remote?
Open a second terminal window on your local computer and run the
lscommand (without logging in to custom.learnhpc.eu). What differences do you see?Solution
You would likely see something more like this:
[user@laptop ~]$ lsApplications Documents Library Music Public Desktop Downloads Movies PicturesThe remote computer’s home directory shares almost nothing in common with the local computer: they are completely separate systems!
Most high-performance computing systems run the Linux operating system, which
is built around the UNIX Filesystem Hierarchy Standard. Instead of
having a separate root for each hard drive or storage medium, all files and
devices are anchored to the “root” directory, which is /:
[yourUsername@login1 ~]$ ls /
bin   etc   lib64  proc  sbin     sys  var
boot  home  mnt    root  scratch  tmp  working
dev   lib   opt    run   srv      usr
The “home” directory is the one where we generally want to keep all of our files. Other folders on a UNIX OS contain system files, and get modified and changed as you install new software or upgrade your OS.
Using HPC filesystems
On HPC systems, you have a number of places where you can store your files. These differ in both the amount of space allocated and whether or not they are backed up.
- Home – often a network filesystem, data stored here is available throughout the HPC system, and often backed up periodically. Files stored here are typically slower to access, the data is actually stored on another computer and is being transmitted and made available over the network!
- Scratch – typically faster than the networked home directory, but not usually backed up, and should not be used for long term storage.
- Work – sometimes provided as an alternative to Scratch space, Work is a fast file system accessed over the network. Typically, this will have higher performance than your home directory, but lower performance than Scratch; it may not be backed up. It differs from Scratch space in that files in a work file system are not automatically deleted for you: you must manage the space yourself.
Nodes
Individual computers that compose a cluster are typically called nodes (although you will also hear people call them servers, computers and machines). On a cluster, there are different types of nodes for different types of tasks. The node where you are right now is called the head node, login node, landing pad, or submit node. A login node serves as an access point to the cluster.
As a gateway, it is well suited for uploading and downloading files, setting up software, and running quick tests. Generally speaking, the login node should not be used for time-consuming or resource-intensive tasks. You should be alert to this, and check with your site’s operators or documentation for details of what is and isn’t allowed. In these lessons, we will avoid running jobs on the head node.
Dedicated Transfer Nodes
If you want to transfer larger amounts of data to or from the cluster, some systems offer dedicated nodes for data transfers only. The motivation for this lies in the fact that larger data transfers should not obstruct operation of the login node for anybody else. Check with your cluster’s documentation or its support team if such a transfer node is available. As a rule of thumb, consider all transfers of a volume larger than 500 MB to 1 GB as large. But these numbers change, e.g., depending on the network connection of yourself and of your cluster or other factors.
The real work on a cluster gets done by the worker (or compute) nodes. Worker nodes come in many shapes and sizes, but generally are dedicated to long or hard tasks that require a lot of computational resources.
All interaction with the worker nodes is handled by a specialized piece of software called a scheduler (the scheduler used in this lesson is called Slurm). We’ll learn more about how to use the scheduler to submit jobs next, but for now, it can also tell us more information about the worker nodes.
For example, we can view all of the worker nodes by running the command
sinfo.
[yourUsername@login1 ~]$ sinfo
PARTITION          AVAIL  TIMELIMIT  NODES  STATE NODELIST
cpubase_bycore_b1*    up   infinite     12   idle gpu-node[1-6],node[1-6]
There are also specialized machines used for managing disk storage, user authentication, and other infrastructure-related tasks. Although we do not typically logon to or interact with these machines directly, they enable a number of key features like ensuring our user account and files are available throughout the HPC system.
What’s in a Node?
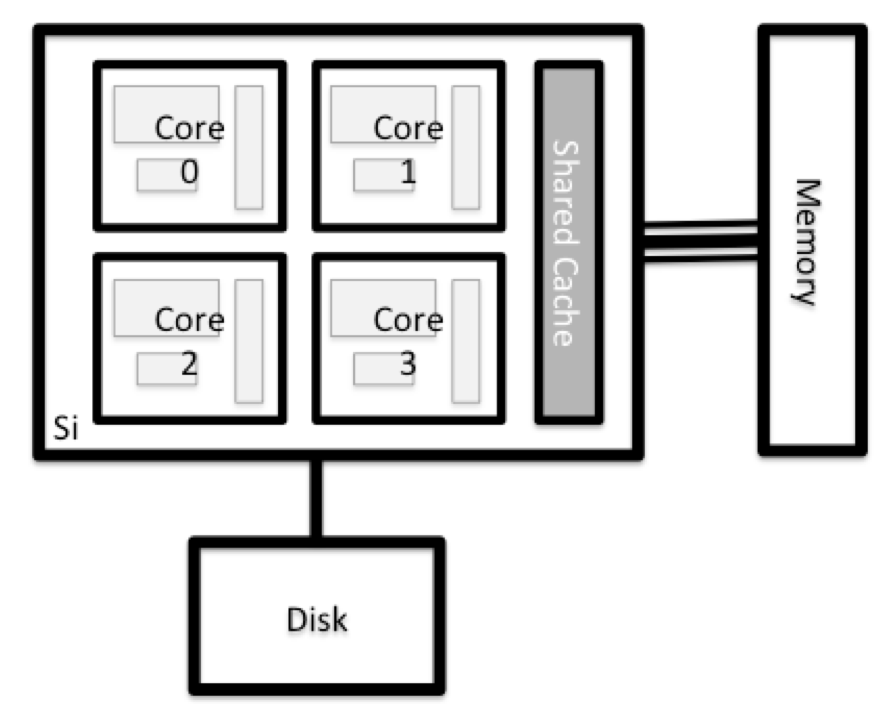
All of the nodes in an HPC system have the same components as your own laptop or desktop: CPUs (sometimes also called processors or cores), memory (or RAM), and disk space. CPUs are a computer’s tool for actually running programs and calculations. Information about a current task is stored in the computer’s memory. Disk refers to all storage that can be accessed like a file system. This is generally storage that can hold data permanently, i.e. data is still there even if the computer has been restarted. While this storage can be local (a hard drive installed inside of it), it is more common for nodes to connect to a shared, remote fileserver or cluster of servers.
Explore Your Computer
Try to find out the number of CPUs and amount of memory available on your personal computer.
Note that, if you’re logged in to the remote computer cluster, you need to log out first. To do so, type
Ctrl+dorexit:[yourUsername@login1 ~]$ exit [user@laptop ~]$Solution
There are several ways to do this. Most operating systems have a graphical system monitor, like the Windows Task Manager. More detailed information can be found on the command line:
- Run system utilities
[user@laptop ~]$ nproc --all [user@laptop ~]$ free -m- Read from
/proc[user@laptop ~]$ cat /proc/cpuinfo [user@laptop ~]$ cat /proc/meminfo- Run system monitor
[user@laptop ~]$ htop
Explore the Head Node
Now compare the resources of your computer with those of the head node.
Solution
[user@laptop ~]$ ssh [email protected]
[yourUsername@login1 ~]$ nproc --all
[yourUsername@login1 ~]$ free -m
You can get more information about the processors using
lscpu, and a lot of detail about the memory by reading the file/proc/meminfo:[yourUsername@login1 ~]$ less /proc/meminfoYou can also explore the available filesystems using
dfto show disk free space. The-hflag renders the sizes in a human-friendly format, i.e., GB instead of B. The type flag-Tshows what kind of filesystem each resource is.[yourUsername@login1 ~]$ df -ThDifferent results from
df
- The local filesystems (ext, tmp, xfs, zfs) will depend on whether you’re on the same login node (or compute node, later on).
- Networked filesystems (beegfs, cifs, gpfs, nfs, pvfs) will be similar – but may include yourUsername, depending on how it is mounted.
Shared Filesystems
This is an important point to remember: files saved on one node (computer) are often available everywhere on the cluster!
Explore a Worker Node
Finally, let’s look at the resources available on the worker nodes where your jobs will actually run. Try running this command to see the name, CPUs and memory available on the worker nodes:
[yourUsername@login1 ~]$ sinfo -n node1.int.custom.learnhpc.eu -o "%n %c %m" | column -t
Compare Your Computer, the Head Node and the Worker Node
Compare your laptop’s number of processors and memory with the numbers you see on the cluster head node and worker node. What implications do you think the differences might have on running your research work on the different systems and nodes?
Solution
Compute nodes are usually built with processors that have higher core-counts than the head node or personal computers in order to support highly parallel tasks. Compute nodes usually also have substantially more memory (RAM) installed than a personal computer. More cores tends to help jobs that depend on some work that is easy to perform in parallel, and more, faster memory is key for large or complex numerical tasks.
Differences Between Nodes
Many HPC clusters have a variety of nodes optimized for particular workloads. Some nodes may have larger amount of memory, or specialized resources such as Graphics Processing Units (GPUs or “video cards”).
With all of this in mind, we will now cover how to talk to the cluster’s scheduler, and use it to start running our scripts and programs!
Key Points
An HPC system is a set of networked machines.
HPC systems typically provide login nodes and a set of worker nodes.
The resources found on independent (worker) nodes can vary in volume and type (amount of RAM, processor architecture, availability of network mounted filesystems, etc.).
Files saved on one node are available on all nodes.